


Whether you’re looking to self-publish or want to seek out a traditional publisher, knowing the proper manuscript format can help set your book up for success. Having the right manuscript format makes manuscript review, editing and event formatting easier.
Look at it this way: have you ever tried to pull out holiday decorations and realized that everything is all just jumbled together in a box? Strings of lights, ornaments, and any other decorations come out in a big tangled ball that takes you hours of extra work just to start decorating.
Compare that to pulling out a box of decorations that were carefully packed away, with light strings wrapped up individually and ornaments packed away into organizers. You can immediately start decorating and not waste any time untangling things.
That’s the difference between a manuscript that is not properly formatted based on industry standards and one that follows established guidelines.
Even if you plan to format your own book for self-publishing, starting with a clean manuscript format will make getting to the finish line easier.
Proper manuscript format becomes even more important if you want to seek out a traditional publishing deal. If your manuscript comes across an agent’s or editor’s desk with non-standard formatting, it’s almost certainly going to end up in the trash without ever being read.
The good news is that formatting your manuscript isn’t that difficult! And knowing these guidelines before you start writing your final draft will make getting your manuscript ready for the next steps that much easier.
What Goes into a Proper Manuscript Format?
Why You Need a Properly Formatted Manuscript
Whether you’re going to self-publish your book or look for a traditional publisher, a properly formatted manuscript is crucial.
On the traditional publishing side, a proper manuscript format shows that you’re a professional who takes your work seriously. Assuming you get a publishing contract, that properly formatted manuscript will make the book formatter’s job a lot easier, as they’ll be able to feed your manuscript into their page layout software without running into a bunch of errors.
On the self-publishing side, a formatted manuscript serves the same purpose when it comes to laying out your book. When you hire someone to edit or format your book's interior, having a standardized manuscript format will make it easier for them to work with your manuscript. For editors, adding editing marks and updates will be easier and will keep interior book designers from having to spend hours undoing improper formatting. In the end, that can also save you money!
And if you’re formatting your own book for production, you’ll save a lot of time and hassle if you start with a clean manuscript format.
General Guidelines for Proper Manuscript Format
Fiction and nonfiction books have the following specifications in common:
- 8.5” x 11” paper size (or A4, roughly 8.25" x 11.75", in some parts of the world)
- Times New Roman or similar serif typeface
- 12-point font size
- Double-spaced lines with no extra space between paragraphs
- Left-aligned text
- One-inch margins on all four sides
Some agents and publishers might have their own guidelines you should follow, so be sure to double-check if they want something different before submitting.
Manuscript Format—The Details
While the above is a general guide that will get you part way to creating a proper manuscript format, there are additional rules you’ll want to follow to make the manuscript-to-finished-book conversion as seamless as possible.
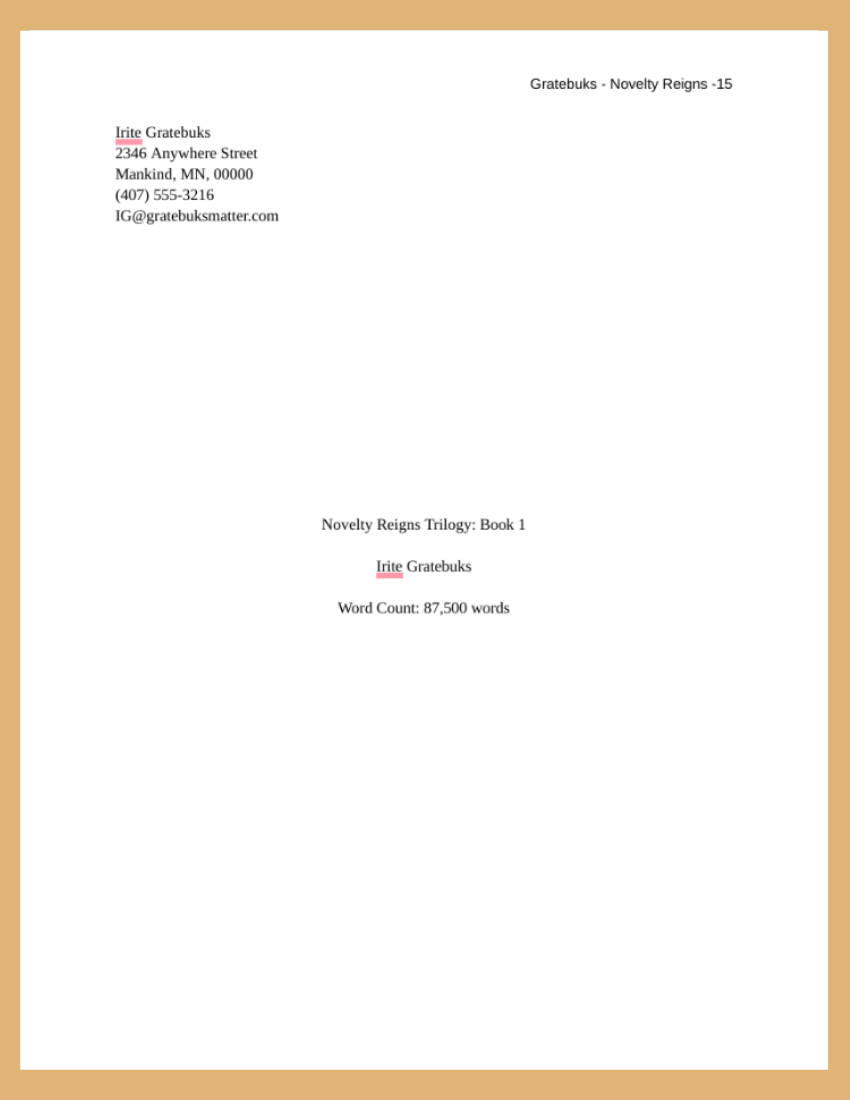
1. Format Your Title Page
Your title page contains all of the vital information about your manuscript and you as the author.
- Place your contact details, including your real name, address, phone number, and email address in the upper left corner.
- If you have an agent, their contact information will go immediately under your contact information, with one blank line in between.
- Center your book’s title halfway down the page.
- Your name (or pen name if you’re using one) goes below the title, with one blank space in between.
- Beneath that, with one blank line in between, put your manuscript’s word count (rounded to the nearest hundred words). Note that sometimes the word count is placed in the upper right corner instead.
- Genre and category of the book can also be included at the bottom of the page.
2. Formatting Other Pages in Your Manuscript
There are a few details you’ll want to make sure you include in the body of your manuscript. These are:
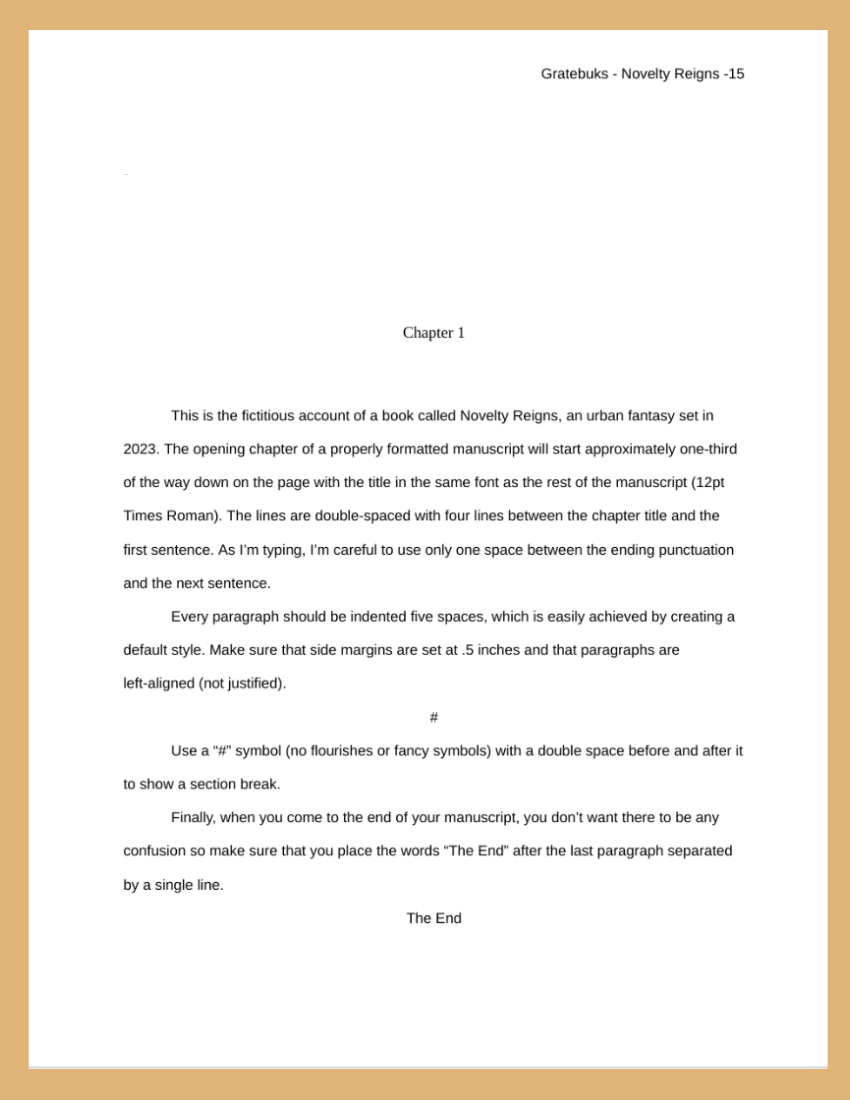
- Start each new chapter on a new page 1/3 of the way down
- Use # for scene breaks
- Include page numbers in your header (preferably in the top or bottom right corners), starting after the title page
- Indent new paragraphs by .5”—be sure to do this with paragraph formatting instead of by using the tab key
- Include a header on each page that has your book’s title (it’s okay to abbreviate this if your title is too long) and your name
- Use a single space after periods
- Use black text on a white background
- Use italics if necessary but never use underlined text
- Use a # to denote a section break
- On the last page, either include “THE END” or a single # centered after a blank line
3. Your Manuscript File
Naming your file might seem like a small detail that doesn’t really matter. But proper naming conventions make it easy for you to find the latest version of your manuscript as well as making it easy for anyone else handling your book to find the proper file.
A popular format is:
Lastname_TITLE_date
Underscores between each section make it easier to read and reduce the chances that the name will be garbled by systems that change spaces to “%20”. Reading Lastname_TITLE_date is a lot easier than reading Lastname%20TITLE%20date.
As for file format, some agents or publishers may request a PDF file for initial submission, while others will request either a .DOC or .DOCX file. When submitting a file for formatting, you’ll definitely want to submit it in either a .DOC or .DOCX format.
4. Things NOT to Include in Your Manuscript
There are a few things that you won’t want to include in your initial manuscript, and should only be provided once requested by either your publisher or formatter. These include:
- Copyright pages
- Dedication pages
- Acknowledgments
- Other pages found in a book’s front matter, as well as some pages found in a book’s back matter
If you’re working with a traditional publisher, they’ll request these things at the appropriate time in your book’s production. The same goes for working with a professional formatter. They’ll let you know how to get that information to them, based on their own workflow. If you’re formatting your own book, you may find it easier to insert those sections from their own files rather than trying to include them in the rest of the manuscript.
5. Final Details to Make Your Manuscript Format Shine
All of the above will get you closer to having a polished manuscript format that publishers or formatters love working with. But there are a few details you can add that will really make your work stand out.
One option is to use styles. If you’re using headers within your manuscript (whether for sections, chapters, or subheadings within chapters), use styles to format them. You’ve probably noticed the dropdown for styles within your word-processing software. Apply those to your headers instead of formatting the text manually. Which one you use for which type of header isn’t as important as being consistent throughout. For example, you might use “Heading 1” for your section titles, “Heading 2” for your chapter titles, and then “Heading 3” for subheadings within your chapters.
Make sure that you proofread your manuscript thoroughly. While a typo on page 50 isn’t likely to hurt your chances with a traditional publisher, a typo in the first paragraph definitely could. And if you’re self-publishing, be sure to hire a proofreader to check your work before publishing it.
Save Time on Proper Manuscript Formatting
Whether you want to self-publish your book or work with a traditional publisher, you can see that a properly formatted manuscript is important. It can also feel a little bit time-consuming if you’re going back through a completed manuscript to then properly format it. Here are a few tips for speeding up that process.
If you’ve used double spaces after your periods, you can do a find and replace to get rid of them. Just insert two spaces in the “find” field and one space in the “replace” field.
If you’ve used tabs for your paragraph indents instead of formatting an automatic line indent, you can also use find and replace to fix that. Just insert a “\t” or “^t” (depending on your word processor) in the “find” field and leave the “replace” field blank. Then use paragraph formatting to automatically indent the first line of each paragraph.
You can remove underlined text in one step if you select the entire document, set it to underline, and then set it to not underline (the same is true of bold or italic text).
The biggest time-saver, though, is to set up your document properly before you start working on your manuscript. By adhering to manuscript format standards from the start, you’ll only have to give a quick double-check to make sure everything looks good when you’re finished!
It’s tempting to add extras to your manuscript to give it personality and make it standout, but be warned, when an agent, acquisitions editor, or interior book designer is trying to get through your manuscript expeditiously, anything beyond standard formatting can be a distraction. Format your manuscript using standard guidelines and leave the "extras" to the interior book designer.
