It looks like it’s become manuscript preparation week here at The Book Designer due to popular demand. Today I’m going to tell you how to do one thing, and only one thing.
But this one thing can turn you from a hysterical, tearing-your-hair-out, mumbling automaton into a cool, calm book layout artist in one easy step.
You think I’m overpromising?
The Local Formatting Problem
There’s one problem moving long documents from a word processor file to a page layout program that has the potential to drive you nuts.
How do you deal with local formatting?
Okay, you need to understand exactly what I’m talking about. When we say local formatting, we’re talking about all the times you typed, let’s say, the title of a book. You then went back, selected the text and made it italic.
You know book titles have to be in italic, you congratulate yourself and off you go to your next chore. Good job!
Well, it’s a good job until it comes time to put your file into your page layout program. I’m using Adobe InDesign, so that’s the one I’m going to talk about.
Your book file in Microsoft Word is 320 pages. Perhaps you’ve used Times New Roman or Palatino or some other standard font you’ve got on your computer. It’s 12 point type, set on double line spacing, flush left and ragged right.
Of course, that has nothing to do with how the final book will look. Maybe you’ve been studying and decided to use Adobe Garamond. You’ve fiddled with the settings to get your page looking the way you want, and your sample is set in 11.25 type and the spacing between lines is 15.25. The type is set justified—even on the left and right—and you’re very happy with the way it looks.
Oops, I Just Lost All My Italics!
Now you dump your file into InDesign. Of course, it doesn’t look right, the typeface is wrong since InDesign by default will try to keep the formatting in your file intact.
Note: InDesign has powerful file import features that are more complex than the point I’m trying to make in this article, and that’s why they aren’t mentioned.
Your italic is intact, but everything else is wrong. What are your strategies now?
- You can click in each paragraph and select the Paragraph Style you’ve set up in InDesign. This will take quite a while and won’t solve all your problems.
- Instead of placing the file in InDesign, you can copy and paste it from your Word document. You will lose all your local formatting. That won’t be fun.
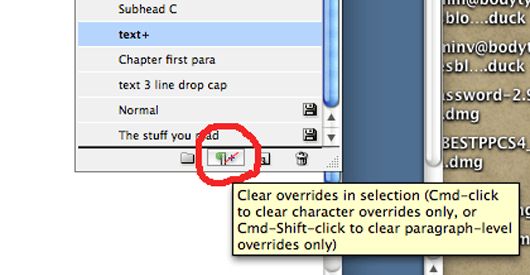
- You can use the “clear formatting” button located on the bottom of the Paragraph Styles palette (more on this in a minute). You can Cmd-Click in each paragraph to clear only the character-level formatting. That will eliminate your italic too.
Every one of these alternatives will lead you down a path you don’t want to travel. But there is a way. A way that will save your sanity.
Remember Those Styles?
Word and InDesign use both Paragraph Styles and Character Styles. These allow you to create sophisticated definitions of each type of formatted paragraph or character attributes.
I’ve talked before about using styles instead of formatting, and here you’ll see another example of why you need to make this a habit.
Let’s step through it together. For the sake of this example I’m going to imagine that this book has lots of italic in it, but no bold and no superscript. That is, italic is the only local formatting we have to deal with here.
- Place the file into your InDesign document.
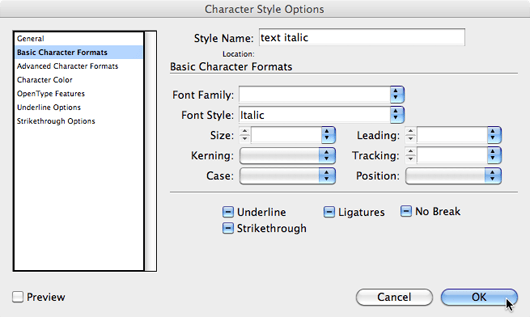
- Create a character style called “text italic.” The only thing in this character style definition is “Basic Character Format” = italic.
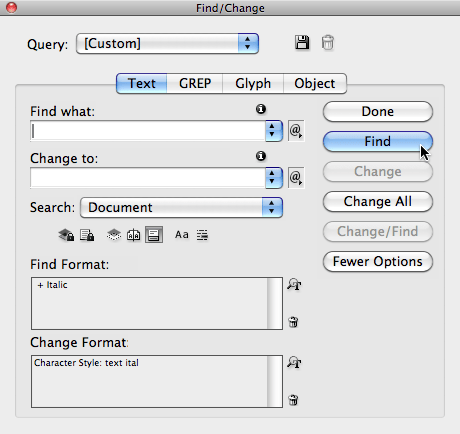
- Find/Change using InDesign’s search and replace function. Search for any instance of italic, and replace it with your new text italic character style.
- Select All to select all the text in your publication.
- Clear Formatting by using that handy clear formatting button we just looked at.
Because we put the italic into a Character Style, InDesign will simply ignore it. You will end up with perfectly-formatted text and all your italic intact.
Simple Steps, Big Rewards
Before this sequence was possible, I spent many hours making sure all the local formatting had translated from manuscript to layout. I missed some, I had paragraphs that were in the wrong typeface and had to be corrected in proofreading. In short, files were sometimes a mess.
I spoke to a client recently who was working with a person new to book layout. She told me she had spent over 30 hours replacing and checking the missing italic from a book heavy with citations. 30 hours.
So do yourself a favor. Use these steps and teach yourself how to keep the formatting you want, while losing the formatting you don’t want. Even if you invest an hour or two now, it will pay off big down the road.
Resources
Lynda.com has great training videos on a ton of software, and keeps current with the latest versions. If you’re tight for money, join for one month for $25 and plan to spend the month becoming an InDesign ninja. Check out their many free videos to get a feel for what they are like.
InDesign Secrets, David Blatner and Anne-Marie Concepcion‘s blog about InDesign is a terrific resource for learning real-world solutions. Their videos are models of great teaching.
The InDesigner videos by Michael Murphy can also teach you a lot about this program, including some of the advanced features.
Adobe’s InDesign Video Tutorials offer more free instruction on using the program.
InstantInDesign.com has a great series on creating ePub files for users of InDesign CS4.
Image licensed under a Creative Commons Attribution 3.0 License, original work copyright by boboroshi, https://www.flickr.com/photos/boboroshi/


