


By Tracy Atkins
You may recognize the name of our guest post author today. Tracy Atkins of Book Design Templates, explains how to create custom trim-sized PDFs for POD publications. If this is something that has perplexed you, you're not alone. I think you'll find this helpful.
For publication to major print on demand book vendors, you typically have to supply a print-ready PDF version of the book for print, set to the proper trim size for your book project. In this quick guide, I will go over the process to create a PDF to trim size using several popular applications.
By default, most PDF applications will create an 8.5”x11”, or A4 sized PDF. This article will help you overcome this often frustrating limitation with ease.
What is a “Trim Size”?
The first question you may have it pretty simple. What’s a trim size? It simply means the physical page size that the book will be printed. For example, if your book is going to be printed in a 6” x 9” format, it has a 6” x 9” trim size. That means your manuscript must be placed onto a 6” x 9” page size in your word processor, like Microsoft Word, Apple Pages, or Adobe InDesign.
Each application will let you create a custom page size for the whole document, or you can save some time and buy one of our pre-made Book Design Templates that are already set up with the right page size. (Shameless plug.)
So, to re-cap, a 6”x9” printed book, requires the book interior be laid out on a 6”x9” page size in your application, and then you have to make a 6”x9” page sized PDF. All three have to match. It doesn’t matter if your book is 5.25”x8”, or 8.5”x11”, everything has to match up properly. Below, I will show you how to take your designed and laid out book and create a PDF with a matching trim size.

PDF Creation for Print Publication
Most print on demand (POD) vendors require a PDF version of your book interior for print publication. Creating a PDF is easy in any application, as Word, Pages, and InDesign have built in PDF generation capabilities.
You may also use Adobe Acrobat to create even higher quality PDFs, in PDF/X-1a:2001 format, to assure the best results from any print on demand vendor. I sincerely recommend Adobe Acrobat Pro, as it really does create the smallest and nicest looking PDFs possible.
Microsoft Word Instructions (Windows using Adobe Acrobat Pro)
Adobe Acrobat Pro is the recommended tool to create print ready PDF files. In this section, we will show you how to create a PDF that is properly set up for most modern print-on-demand vendors.
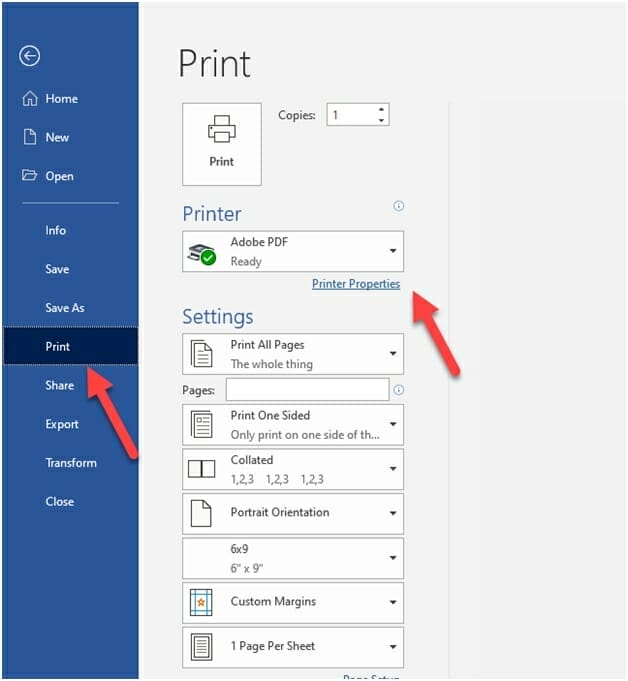
- To create a PDF of the book, click the file tab in Word, and then print on the sidebar menu.
- Select Adobe PDF from the drop down under the printer list.
- Click Printer Properties

- Click Add, to add a new Adobe PDF Page Size
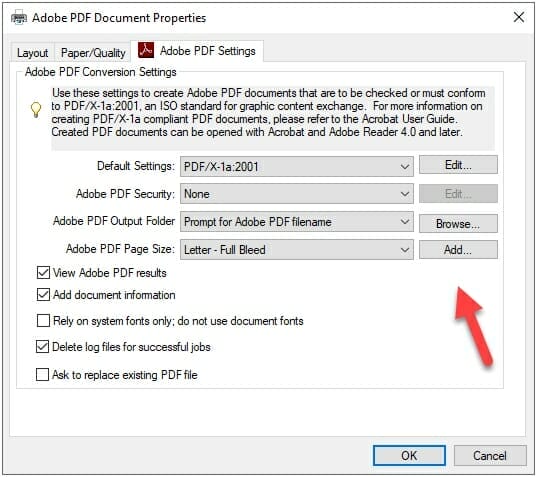


- Add a new paper name that matches your trim size. In this example, I added 6”x9”, and set the width and height of the page to match the intended trim and the page size of the word document. Then I clicked Add/Modify to add the new page size. (You only have to do this step once for each trim size you wish to make PDFs.)
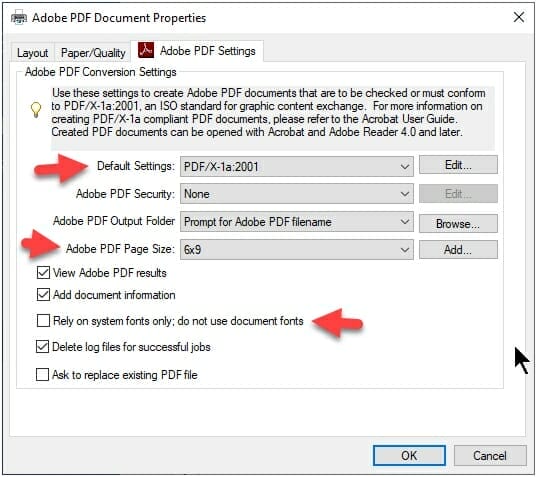
- Now, select the PDF/X-1a:2001 default settings. Select the new trim size from the Adobe PDF Page Size selection. Uncheck “Rely on System Fonts Only” so that you don’t have font embedding issues with your print upload. Click OK.
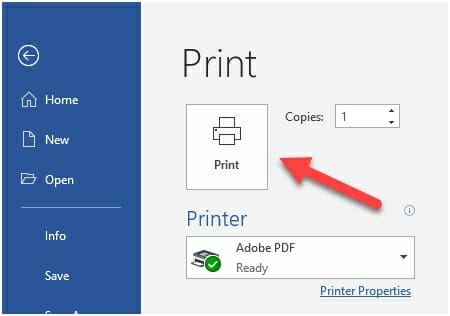
- Now click the Print button, and your PDF will be created to trim size, and will be press ready.
Microsoft Word Instructions (Windows built-in PDF maker)
Word has a built in PDF maker application. It does a fair job of creating a PDF, but will often create PDFs that are larger in size, and will often throw up warning flags with some print vendors. (That you can usually ignore. But don’t tell anyone I told you that.)
- To create a PDF of the book, click the file tab in word, save as option on the sidebar menu.
- Select PDF (*.pdf) from the drop down under the file name.
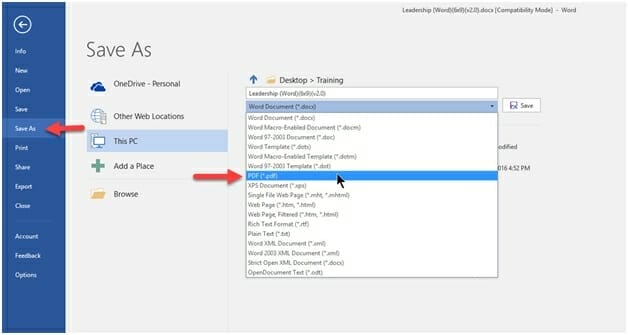

- After you select PDF (*.pdf) from the drop down under the file name, click the Options link. This will open a new save as window. Ensure that PDF (*.pdf) is selected as the save as option.
- Click the Options button to open the Options dialog box.
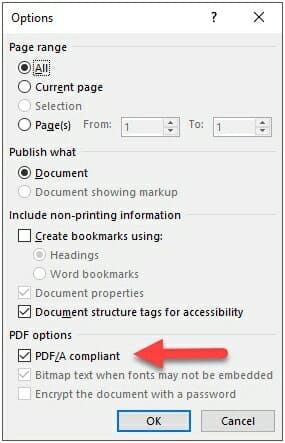

- Click on PDF/A Compliant check box, to place a check mark in the checkbox. Click OK. (This will create a PDF/A format file that embeds fonts and graphics.)
- Click save to create a PDF copy of the book in PDF format for publication, set to trim size.
Microsoft Word Instructions (Mac)
Word for Mac behaves differently when it comes to PDF creation, compared to the Windows version. You will have to set up a trim-size page size before generating the PDF. The built-in tool does a fair job of creating a PDF file, but again, is not as refined as Adobe Acrobat’s PDF tools.
- To create a PDF of the template, create a custom page size that is the same dimensions as the book's trim size in Word. (You only have to do this step once for each trim size you wish to make PDFs.)
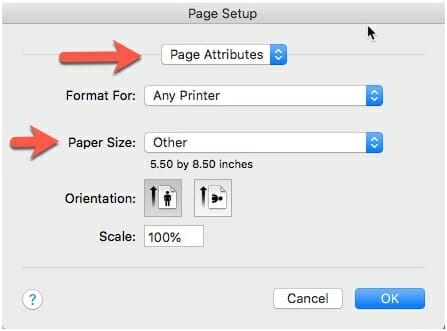
- On the Word toolbar, click file, and then Page Setup.


- Select "Page Attributes" from the selection box. Select the paper size that matches your template's trim size from the paper size drop down. (For example, a 6x9" trim template, requires a 6x9" paper size.)
- Click OK if the paper size is available.

- If the paper size for your trim is not on the list, click on the Manage Custom Sizes option.
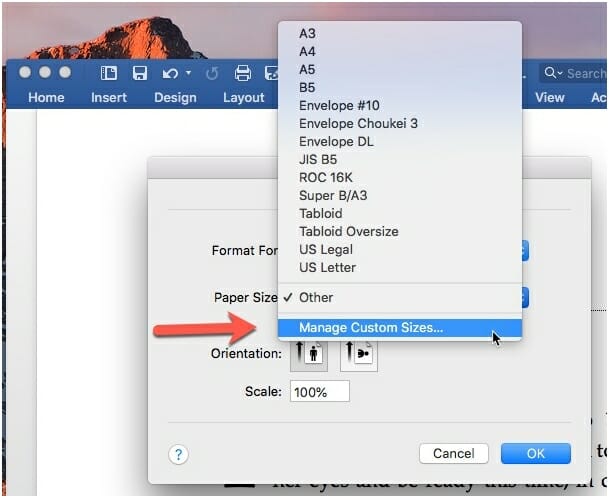

- Click the plus (+) icon to create a new custom size.
- Set the paper width and height to match the trim size of your book file or template.
- Set all margins to 0 in.
- Click OK.

- Once the page size has been set up, you may save your PDF from within Word using the save-as function to export a PDF.
Apple Pages Instructions
Similar to Word, to create a PDF of the book, create a custom page size that is the same dimensions as the book's trim size in Pages. (You only have to do this step once for each trim size you wish to make PDFs.)
- On the toolbar, click File, and then Page Setup.
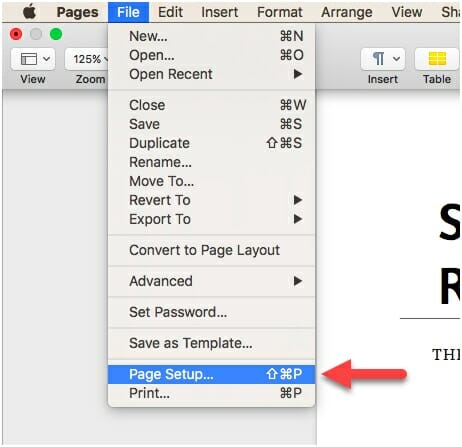

- Select the paper size that matches your template's trim size from the paper size drop down. (For example, a 6x9" trim template, requires a 6x9" paper size.)
- Click OK if the paper size is available.
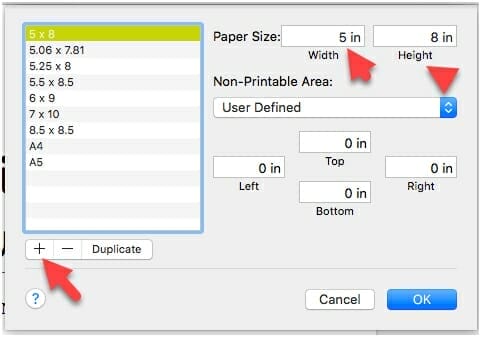
- If the paper size for your trim is not on the list, click on the Manage Custom Sizes option.
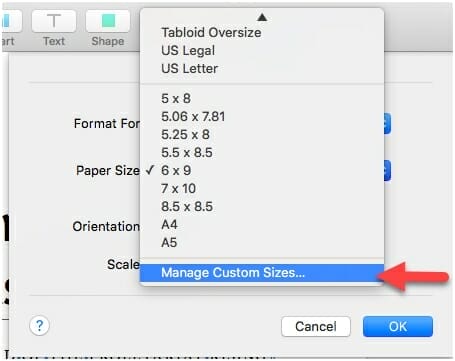

- Click the plus (+) icon to create a new custom size.
- Set the paper width and height to match the trim size of your template.
- Set all margins to 0 in.
- Click OK.

- Once you have selected a custom paper size that matches your trim size, you can create the PDF.
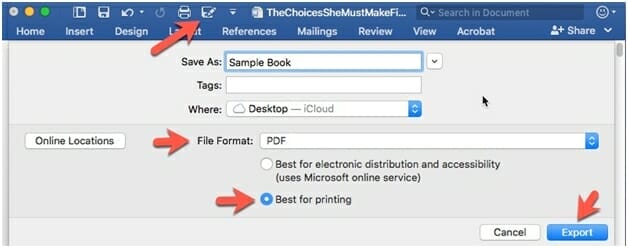
- Click on File on the toolbar and select Export, then PDF.
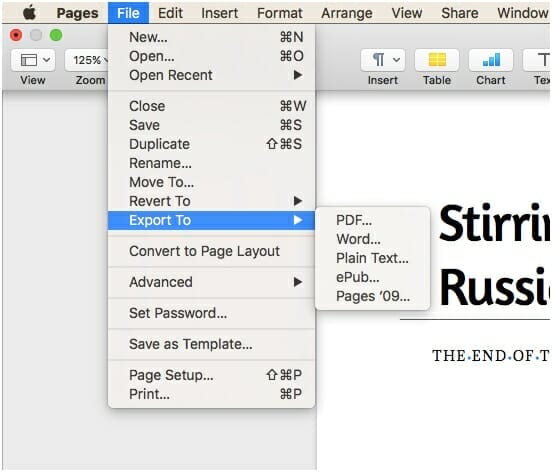

- Select the highest image quality option from the drop down.
- Click Next.
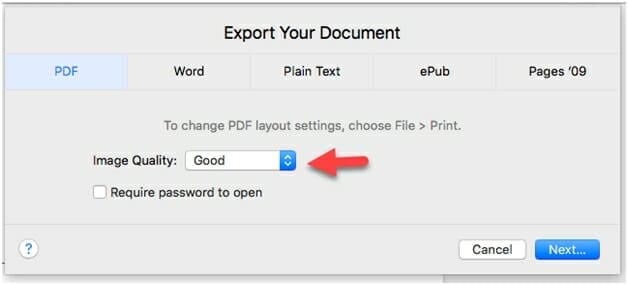

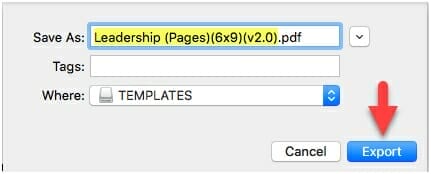
- Select the location you wish to save the PDF.
- Click Export to create the PDF.
- You may upload this PDF file to your POD vendor.
Adobe InDesign Instructions
Adobe InDesign already has Adobe Acrobat Pro’s PDF engine built in, so it creates the best-looking PDFs right out of the box.
- To create a PDF in InDesign, click on the File menu from the toolbar and select Export from the drop down.
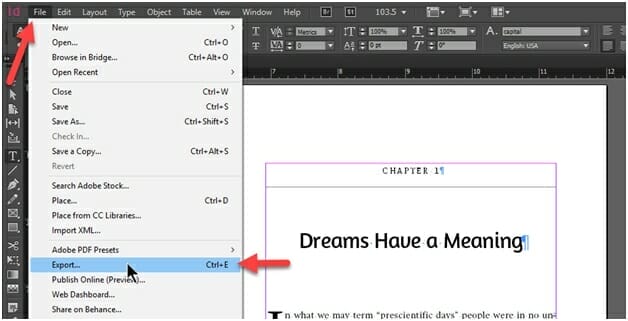

- Select Adobe PDF (Print) (*pdf) from the save as type drop down box.
- Click save.


- Select [PDF/X-1a:2001] from the Adobe PDF Preset drop down.
- Click All in the Pages section.
- Click Export.
- This will create a print-ready PDF.
In Closing
Creating a quality PDF is an essential component of creating a print-ready book file that will be accepted by vendors like KDP and IngramSpark.
Adobe Acrobat Pro is the top tier tool for creating PDFs and we highly recommend it.
And finally, for the easiest way to lay out your book interior on your own, please take a look at our templates at BookDesignTemplates.com.
Photo: BigStockPhoto
