


By David Kudler
Congratulations! You’ve finished your manuscript and gotten it into a format ready to be uploaded for sale.
Now it’s time to get your ebook ready for sale.
For most of us, Amazon’s Kindle Direct Publishing or KDP is the first and most important retailer we submit our ebooks to. (For some, it’s the only retailer they submit to — especially at first.)
Each retailer site has its own proprietary system for uploading ebooks for sale and distribution. Each requires that you enter your financial and tax information before you can publish to their site. Below we will lay out how to log on to and manage each account. Here’s a look at how to get onto KDP and get your first book up for sale.
Amazon’s Kindle Direct Publishing
To log into your Kindle Direct Publishing account, go to https://kdp.amazon.com.[i]
Use your username and password to log into your account. You can use the same account you use to order books, groceries, etc. from Amazon if you want — or you can choose to create a different identity. The one thing you can’t do is have more than one KDP account for your own use. According to Amazon’s terms of service, that’s cause for immediate and permanent expulsion. [ii]
You may be asked to confirm the account that you’re signing in on — click on the Sign In button. If you were already signed into a different Amazon account, click on the link reading Click here to sign in as a different user.
Once you have logged in, you will be presented with your Bookshelf screen. This is where you add titles, and where you manage the titles once they’re published.
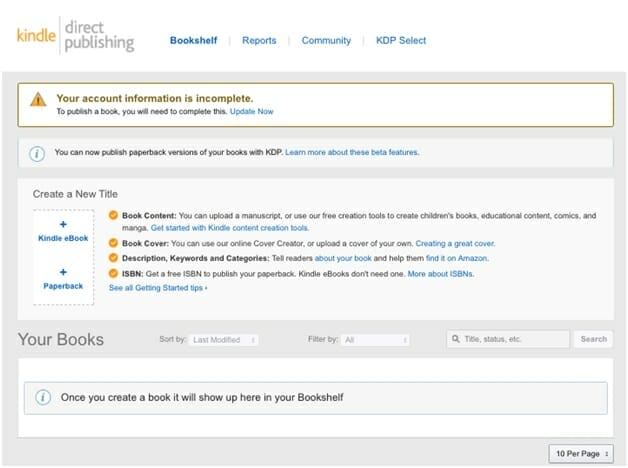
Banking
Before you can hit the Publish button, however, you need to enter some information into your account. Go to https://kdp.amazon.com/en_US/.
You will be asked to sign in again as a precaution.
Check the information that we have entered regarding your name and address and make any changes that you wish. Below that form, click on the button reading Complete Tax Information. You will be led through a short series of questions that will give Amazon the information that they need in order to track your payments from a tax standpoint.
Next, click on the link reading Add a bank account. You will need the name, routing number, and account number for the account into which you wish Amazon to pay your royalties.
By the way, if the idea of sharing your banking and tax info with Amazon makes you nervous… Well, that’s sensible. However, if you want them to pay you, they need your tax info. And if you DON’T want them to pay you (because you’re not planning on charging), they don’t want your book.
If you are nervous about revealing a pen name, don’t be. They don’t consider people who sign up for KDP to be the authors of the work, but rather the publishers.
If you’re worried about them having personal information about you… Sorry. It’s the cost of entering a business arrangement with them. They’re going to generate a 1099 at the end of every tax year, so they need your tax ID.
Once you’ve entered that data, you may choose to designate how you wish to be paid by Amazon’s various international units. By default, the account is set to pay by check in the local currency. You may choose instead to pay by electronic fund transfer (EFT) either in the local currency or in US dollars.
Publishing
Now that you’ve completed the financial information, Amazon will allow you to publish your book!
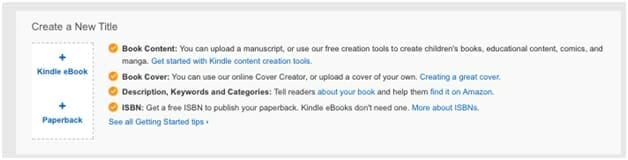
Click on the button at the top of the screen reading Bookshelf. This will return you to your list of titles. Click on the +Kindle eBook button, and you will be taken to the page to add this book to Amazon’s database.
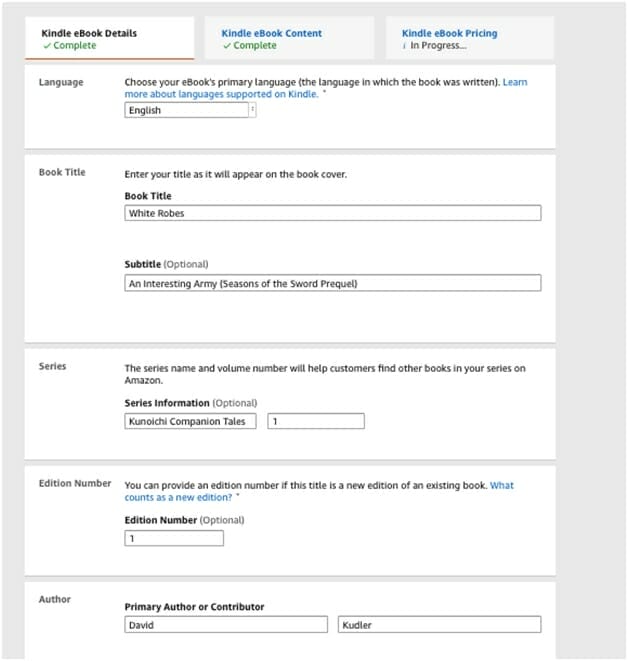
The first page (Kindle eBook Details) is where you add all of the metadata that you have pulled together. Go through and make sure you fill in all of the appropriate entries. Remember — more detailed, more accurate metadata is how potential readers will find and buy your book.
On the second page (Kindle eBook Content), you upload the ebook file and cover image.
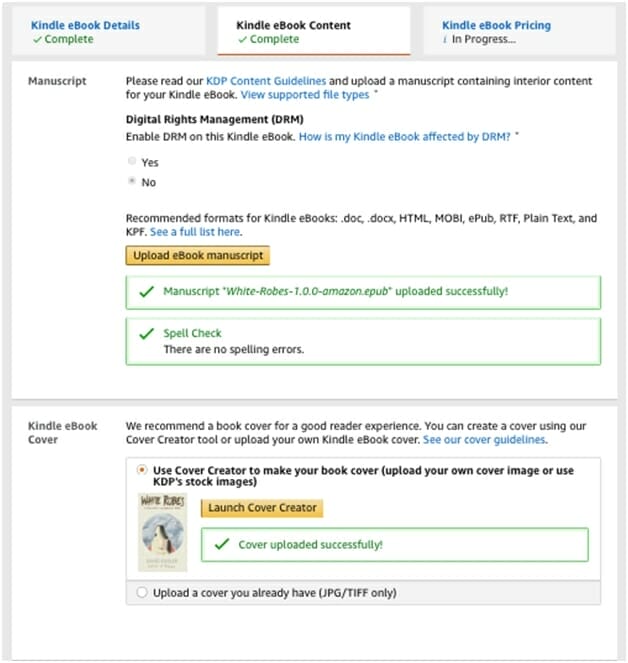
By the way, I never bother with digital rights management (aka DRM). As I’ve discussed, it’s not an effective anti-piracy tool; it’s mostly a way for retailers to enforce customer loyalty by making it harder for them to bring their purchases with them to a different platform.
The best ebook file format to upload, in my experience, is a well-formed ePub file. But as you can see, KDP accepts many others. [iii] Upload the file; if there are any problems, the page will tell you. [iv]
The cover image needs to be a JPG or TIFF file; the ideal dimensions, according to Amazon, is 2560 pixels tall by 1600 pixels wide. Again, if there are problems with the file, the page will tell you.
Once you’ve uploaded both files, the page will convert your files into a .mobi file. [v]Once the conversion is complete, you can use KDP’s online previewer by clicking the button reading Preview book.
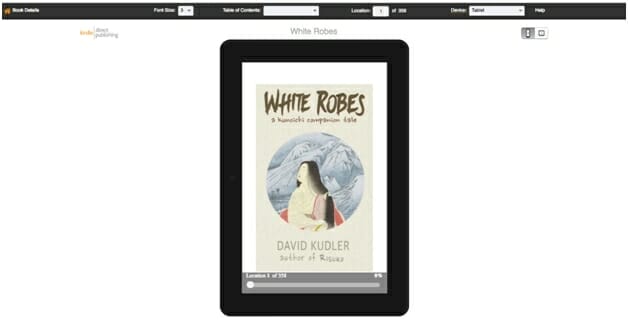
You’ll be able to see what the book will look like on various Kindle devices using the Device pop-up; you’ll even be able to check out the navigation by checking out the Table of Contents pop-up. You can toggle between landscape (wide) and portrait (wide) views, and see how the text looks if the reader chooses different font sizes. Look through the whole book as it would look on different devices. [vi]
Once you’re done, click on the link in the upper-left-hand corner reading Book Details.
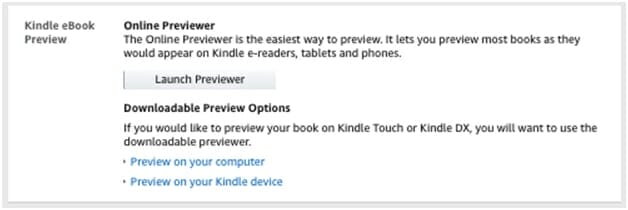
You can also click on the link reading Preview on your computer to download the .mobi ebook file. Once it’s there, you can open the file in your favorite Kindle app or load it onto a Kindle. My recommendation is to do all of the above — the ebook will look different in each. Make sure the ebook looks the way you want it to. If not, go back to editing your ebook and fix what isn’t working.
At the bottom of this page, you can add the last bits of metadata: the ISBN (if you have one — it’s thoroughly optional for ebooks at this point) and your publisher name. [vii] Why are these pieces of metadata on this page rather than with the rest of the identifying details about your book on the Kindle eBook Details page? No idea. But there they are.
Once everything is up to snuff, click on the button at the very bottom of the page reading Save and Continue. It may take a few seconds, but you will come to the final step in the process, the Kindle eBook Pricing page. First decide whether you want to sell your ebook exclusively through Amazon (for the next 90 days, at least). Click on the check box in the KDP Select Enrollment box if you want to go steady with KDP. If you’re not sure, check out my pros and cons for enrolling in the program.
Next, verify your rights — whether you have the rights to sell the title world-wide, or in any particular country. [viii]
Next, choose your royalty share. Ebook pricing has a number of variables. If you wish to earn the higher 70% royalty (minus $0.15 per megabyte) you must price the book between $2.99 and $9.99 — or the equivalent in the other currencies. If you wish to charge more or less, or you wish to avoid the “transfer fee,” select the 35% royalty option.
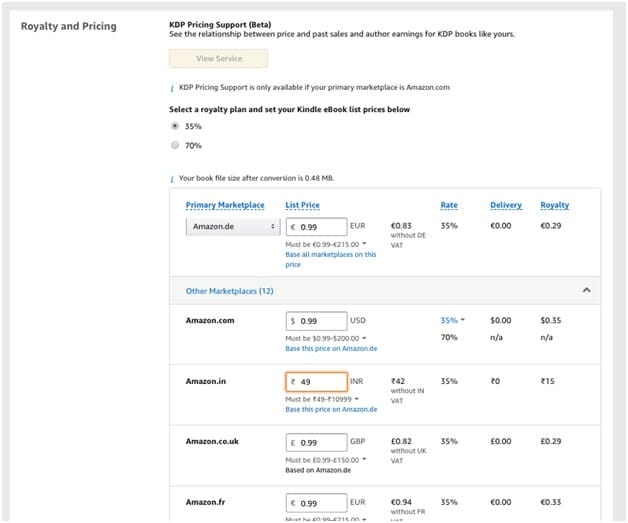
Next choose your price. You may either allow Amazon to convert automatically from the US price that you have set to prices on their other local sites, or you may click on the Other Marketplaces link to select your own price for each. Accepted wisdom is that it’s better to have a “pretty” local price (i.e., £2.99 or €3.49 or ¥300) than an automatic conversion (i.e., £3.27 or €3.37 or ¥282).
Once you have completed the pricing section of the page, we only have a few check boxes remaining. If there is a print edition of your book, you should select the MatchBook option, which allows purchasers of those editions to buy the ebook at a steep discount. You can decide whether to reward print buyers buy giving them a free copy, or charging $0.99, $1.99, or $2.99 — so long as it’s lower than half the actual price.
The Lending option allows buyers to “loan” their copy to another Amazon customer for a week; this is, in fact, a good way to encourage purchases; we recommend that you select it. If you chose the 70% royalty, you must offer your title for loan.
Ready? Now comes the fun part!
Click on the button reading Publish Your eBook. Congratulations! Your book should be available soon — most likely in a half a day or less. [ix]
You will be returned to your Bookshelf page. Your title will be greyed out; you won’t be able to edit any of the settings until it has been published. From that point on, however, you can change any of those settings — subtitle, keywords, categories, cover art, prices, even the book file — as often as you wish. Experiment! See what works!
And welcome to the ranks of independent publishers.
[i] I’m using the Amazon.com address here — if you’re publishing outside of the US, use your local domain.
[ii] I have created multiple KDP accounts for other publishers — but have only one for myself. Remember that you can list different authors (pen names) and publishers (imprints) for different genres, if you’re trying to keep them distinct. My KDP account has books by 20 different authors (and several pen names) that are published under six imprints.
[iii] Not all are equal, however. I don’t recommend submitting a plain text file, and converting from PDFs is a terrible idea.
[iv] It may not explain what’s wrong terribly well. If you don’t understand what’s wrong, try searching in Amazon’s voluminous (if not very clearly laid out) Help pages, or search in the very helpful Kindle developer community forums. Just make sure to search before you post a question; the answer is almost certainly there already. If you uploaded an ePub file, you may also consider running your ebook through validation.
[v] Okay, actually a smooshed together package containing an ePub file (aka KF8) and an old PalmPilot ebook file (aka MOBI7).
[vi] Know that the previewer is not 100% accurate. For that, you need to download the file and check it on every possible Kindle or Kindle app. Consider asking your friends and betas to field test the file for you.
[vii] Come up with one. Use it. Don’t use your own name.
[viii] Unless you’ve either licensed the right to the title from someone else or licensed away the rights to the book in certain territories for certain languages, you almost always want to select All territories (worldwide rights). This will allow Amazon to sell your book to anyone in any country who wants to buy it.
[ix] First-time publishers may take longer, as may publishers in some more risqué genres.
Photo: BigStockPhoto
