Lightning Source (LSI) is my preferred vendor for print-on-demand services. Their quality is good, distribution options good for most books, and a technical staff that actually knows what they’re doing. Combined with responsive customer service, it’s easy to see why it’s the default in its field.
LSI provides pretty adequate documentation but, as you might expect of a company that’s part of a rather large corporate structure, (Ingram Industries is number 226 on Forbes’ Largest Private Companies) the documentation is scattered and not as tightly integrated as we might like.
Like anyone else, I had to work out the exact steps LSI needed my book files to go through to guarantee that I wouldn’t have holdups later on down the line. I also wanted to ensure that I was getting the best quality printing. Digital printing isn’t quite up to the standards of offset printing yet, so it pays to make sure your book and cover come out as good as they possibly can.
Keep in mind that when you upload your file to Lightning Source or any other printer, you are taking responsibility for the accuracy of the file. Re-dos and makeovers can be very costly.
Now You Too Can Make A Perfect File
Everyone who sends files to LSI for print-on-demand book production has to work out how to walk through the steps they outline in the documentation. There is no single thing that’s particularly difficult to do, but after all the work that it takes to get a book to press, I certainly don’t want any mistakes at this point.
Let’s go step by step through the process. There are some good practices we’ll encounter along the way.
Whoa, Are You Really Ready?
Before we get to creating your reproduction quality PDF file, we need to look at the two areas of InDesign files that cause the biggest problems in the process: linked graphics and fonts.
Adobe InDesign CS4 provides great tools for dealing with both so, once you’ve saved what you consider to be your absolutely, positively, final, no more changes whatsoever, file, we’ll examine both of these trouble spots.
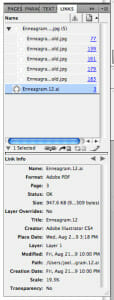
First up is the Links palette, here’s one from a recent project.
As you can see in the first example, the graphic “enneagram.12.ai” is highlighted in the upper half of the palette. The lower half shows information about the file and the state of the link: “OK”. But what if a link is not “OK”? Here’s another link from the same book:
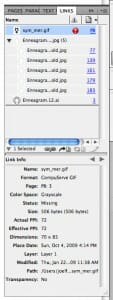
Here you can see the graphic “sym_mer.gif” highlighted but there’s a big red question mark next to it. This alert means that InDesign cannot find the graphic; it’s probably been moved since it was placed in the document, or it may have been accidentally deleted.
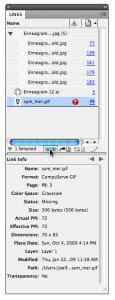
In the lower half of the palette the status shows as “missing.” These are the kinds of problems you want to uncover before you get ready to produce your PDF. In this case you can use the “relink” button at the bottom of the Links palette to navigate to the file’s new location and let InDesign know where to find it. Here you’ll see the cursor on the button, which will open a finder window for naviation.
Check Every Graphic in Your Book File
You need to examine each graphic in your book to assure yourself all graphics are in place and ready to convert.
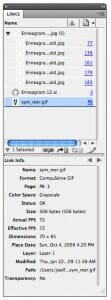
In the next image you’ll see that “sym_mer.gif” has been located and re-linked to the file. It now shows a status “OK” in the bottom half of the dialog.
This kind of pre-checking is really the most efficient way to create PDFs or any other type of file you may be called on to produce for the printing of your book. Book designers deal with these issues constantly, since our clients use a wide variety of printers. Each printer has their own specifications and their own requirements. Some printers even detail the exact way you are supposed to name the files that you submit. Keeping up to date with these requirements, and making sure our files conform to each printer’s needs is just part of the job of producing books today.
Now, having checked your links, you are ready to go, right?
But There’s Another Check First
Well, almost ready. Equally important is checking the fonts in the book, and it’s often surprising what you can find when you look. In the next post we’ll take a look at how to quickly determine what fonts you’re putting into your PDF file and the most efficient way to get your file ready for press.
Do you have tips on checking the graphics in InDesign files? I’d love to hear about them in the Comments.


